MorpHex Project – Morphing Hexapod – By Kåre Halvorsen – 81020
DESIGNED BY :
A new project called MorpHex (2010/11/19)
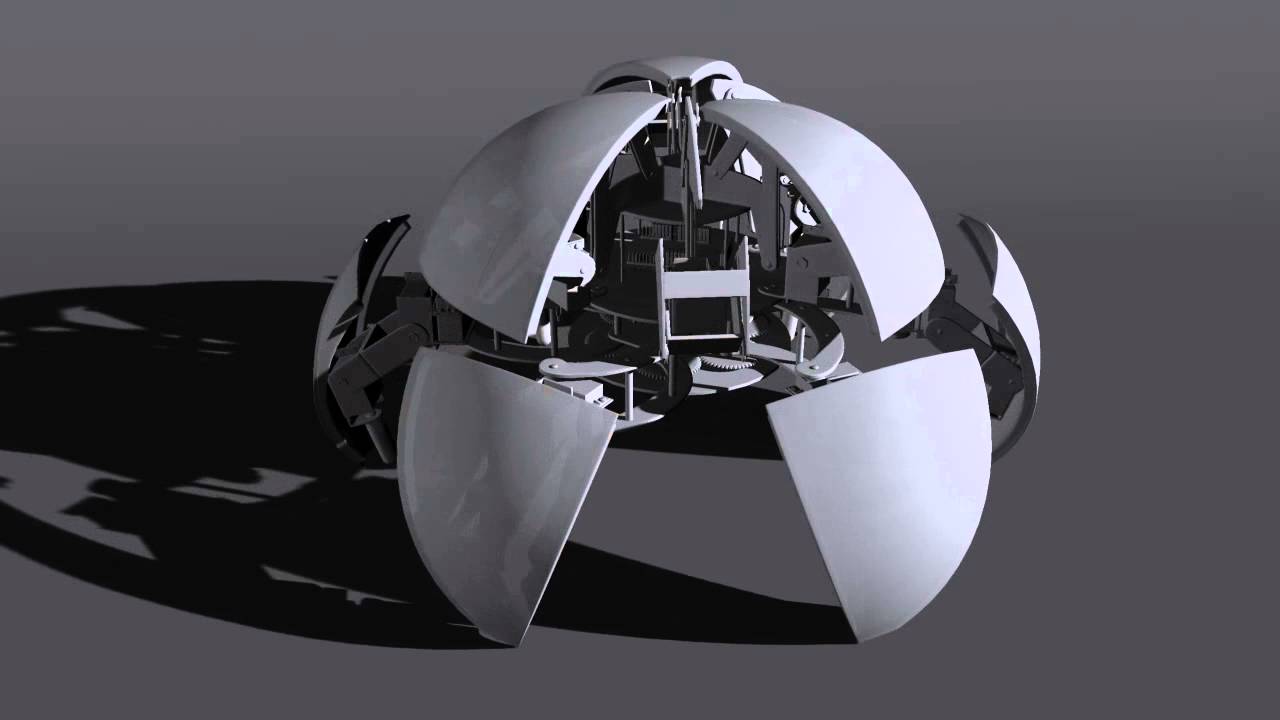
This is a project I’ve been thinking on for a very long time. Shortly explained this is a sphere shaped hexapod that I plan to give the following features:
- Roll freely like a ball
- Have different sort of locomotion for moving in any direction
- Variable inner-body dimensions
- Transform from a sphere shape into a hexapod and vice versa
- Walk like a hexapod
Before I started to make any exact sketches or started building anything, I shared my ideas with my friend Jeroen Janssen (Xan). We talked about this project when I visited him in Netherlands this summer. At first I was thinking of using a fixed sized inner body with 6 x 4 DOF legs, similar to what I used for the T-Hex hexapod. Another problem was finding a sphere shaped material that I could use. Jeroen and I went to a local toy-shop and I just asked him to look for ball-shaped object. After a little while Jeroen had found a globe! At that moment I got the feeling that using a globe could actually work. After a few months and some searching in different book and toy-shop’s I found a 28cm in diameter globe from Toysrus. It was also cheap and the plastic material seemed to be relative solid (about 3mm thick).
I’m cutting out 12 identical sphere parts. Using a simple handsaw and cutting along the lines of the Longitude every 60 deg. The line of equator was made of 1mm thick dark blue plastic band and was very easy to remove, that resulted in a perfect clean edge too! Here are some pictures of the sphere parts:


The map coating was very easy to peel of. The trick was to preheat the surface carefully and then start in one corner and just peel off the whole layer. To the left is the original part. The middle part has the globe/map layer peeled off and the right part is sanded by hand. As you can see the material is very transparent, I do have some future ideas of mounting several LED’s for some cool lighting effects.


Morphing inner-body:
The principle is very simple. I’m using one digital 5645 servo in the centre of the body, the servo holds two delrin gears.
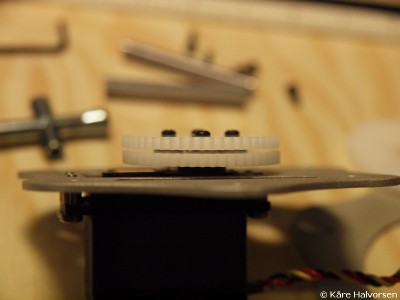

I’m using 7x of the LPA gear sets from Lynxmotion. One gear with SES holes is mounted to each of the 6 outer body sections.
This construction makes it possible to adjust the body dimension by about x2 using only one servo.


The main reason for making the body like this is to hopefully make some more free space for each leg when the robot are in the walking mode. Even with the increased body size the legs are still going to be highly restricted in free motion caused by the large sphere parts, but I think it will work![]() I’ve already done some changes to the body section, like replaced the 1,5 mm aluminium parts used on the 6 outer sections to 2mm for more strength and stability. And also some more stuff like an holder for electronics.
I’ve already done some changes to the body section, like replaced the 1,5 mm aluminium parts used on the 6 outer sections to 2mm for more strength and stability. And also some more stuff like an holder for electronics.
There is still a lot of work left and I’m currently working with assembling all the legs. In total there will be 31 servos, 12* 5990 + 19*5645.
A little update on MorpHex (2010/11/19)
I just wanted to post some minor updates. I’ve added two decks (acrylic, I’m not sure to be honest) that are going to hold the electronics on one side and the battery on the other side:


One big challenge was to guide the power wires from the battery from one side to the other due to all the gears and the outher (variable) body parts. I solved it by carefully drill a hole through the battery-deck and inserting two brass tubes.


First teaser video of MorpHex (2011/6/30)
Recently I’ve had to make a hard decision. I’m not ending the project, but there are some issues that has bothered me for a while. The fact is that I’m afraid MorpHex is just a little bit to heavy while being in sphere mode. Another thing is the wires, a total of 36 (x3) servo wires gets a bit to crowded in the center of the body. For reducing total weight I’m using a simple 3 DOF leg not the double femur/tibias. Instead I plan to mount 6 servos on the top deck for manipulating the six upper half spheres. At this moment I’m using 5990′s on the femurs and 5645′s on the tibias. The 5990′s are directly power by the main 2S (7,4v) LiPo battery. The other 13 5645′s are powered using one Turnigy 8amp (max 15 amp) switch regulator. I’m also planning to use 36 Starlites from BasicMicro as background light inside the sphere. The Starlites require an additional regulator, i’m using a 3 amp switch regulator (also Turnigy).
I’ve also decided to go for one single ARC-32 board from BasicMicro for commanding the servos. Also a XBee module and a Razor 9 DOF IMU running AHRS code for getting accurate orientation in sphere mode.
Here is a short teaser video of MorpHex (not yet completed). The main goal of this video was to demonstrate the morphing body part.
I’m using an ARC-32 board. Its from Basic Micro.
For making the hexapod work with a variable sized body there are some math to do, simple trig (law of cosine). The input value to the math algorithm is the angle of the inner body servo. Then you’ve to calc the new bodyradius and a new coxaoffset. When you have the body radius its pretty easy to find the new body dimensions (coordinates) for a circular body.
After that you need to adjust the positions of the feet corresponding to the new body radius. In the walking gait you can re-set the inital positions when the leg is lifted.
Next step is to work more on the code (sphere mode) and start mounting the actual sphere parts.